Zarlino is an interactive music education application under development by me and Michael Kaulkin at Cantus Firmus, LLC. Zarlino is currently in the prototype stage. In addition to outlining the broad syllabus, we are focused on building out some of the initial lessons, conceptualising the types of activities that will lead to the most effective learning, and researching the techniques to support them.
Zarlino integrates three areas of musical learning: music theory, music literacy, and ear training. It is intended for virtually anyone with an interest, from beginners to practising musicians. Zarlino’s initial lessons make no assumptions about the user’s experience and start with the most basic concepts, building up the user’s working knowledge along a guided sequence of topics.
While some of the exercises are text-based or visual and involve common mouse or touch gestures, one of our major goals was to involve some musical practice, with the user’s own voice driving most of the exercises, in real time using the microphone as input.
Pitch Matching Exercise
Our first lessons focus on recognising relative pitches (whether one pitch is higher than another), and don’t have any reference to a staff or any other particular musical conventions. We establish the concept that up and down on the screen represent higher and lower pitches respectively, and we use an evenly graduated scale, with each line or space always one semitone.
The first vocal exercise starts by playing a tone and then asks the user to sing it back. (The tone can be replayed again by the user if needed, and the app starts listening only when the user presses a microphone button.) An indicator moves up and down the scale according to the user’s pitch, until the target pitch is sustained for the necessary amount of time. The sequence here shows the singer’s voice starting far below the target pitch and then rising to meet it.
Since this is the user’s first vocal exercise with Zarlino, and we don’t yet know anything about his or her vocal range, it’s possible that the tone might be too high or too low to sing comfortably. We instruct the user that if this is the case, then they should try to sing the “same” sounding note in their natural range (an octave below or above). Zarlino will match the pitch regardless of the octave. We repeat this exercise a number of times with different notes, to determine the best working range for the user, which is then saved for later exercises. (This can be changed manually in the settings page.)
TODO: Currently we are using Musical.js for sound output. It’s a pretty decent Javascript synthesiser package including a basic “piano” sound, but ideally since Zarlino focuses on the user’s voice, we would like to be able to play realistic singing human voices for them to match.
Solfa Exercises
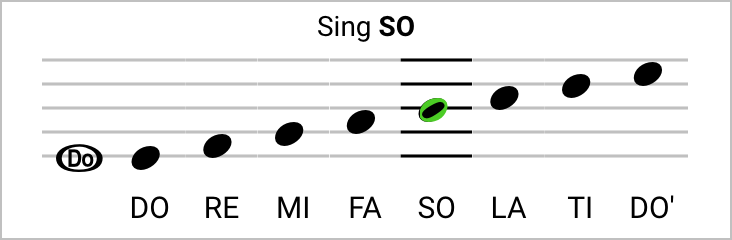
Subsequent lessons introduce the basic musical staff, but without a clef or any reference to the usual lettered notes of a piano or other instrument. Zarlino uses a music education method called solfège, or solfa, which uses the syllables do, re, mi, fa, so, la, and ti to teach the musical scale (as in the song from The Sound of Music).
In particular, we use a system called movable do, which focuses on the relative intervals between the notes of the scale, and which is more commonly used for teaching singers rather than instrumentalists. In this system, DO can be assigned to any pitch and the rest of the scale follows from there.
In this exercise, the user sings all the notes of the scale in order. Each note is highlighted in sequence, and similar to the previous exercise, an overlay indicator shows how closely the user’s voice is matching the target. As with many of the exercises in this section, a special symbol shows where DO is placed on the staff, and the user can click it at any time to hear the reference pitch again. Also note that because these exercises involve only pitches and not rhythm, we avoid using any of the conventional beat-length note symbols (e.g., whole, half, quarter, etc).
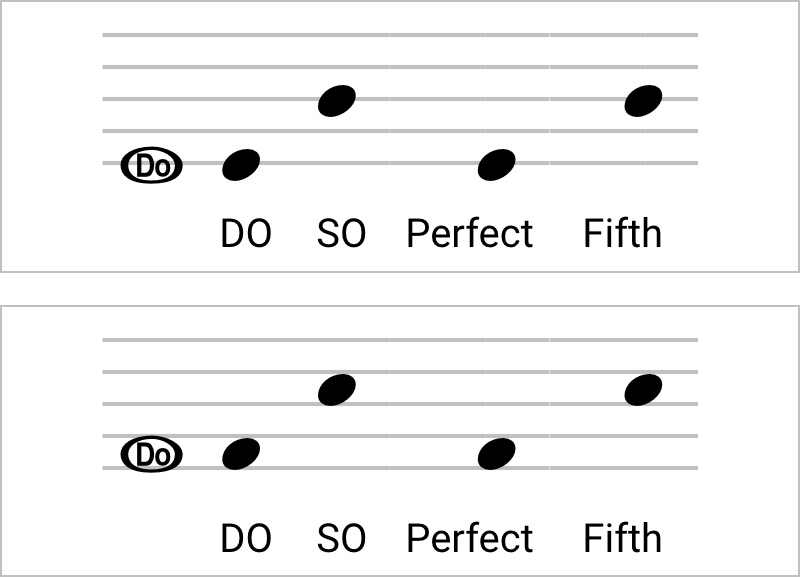
Here the user learns that the interval between DO and SO is a perfect fifth, and practices singing the interval, starting at different pitches, first with the solfa names, second with the interval name.
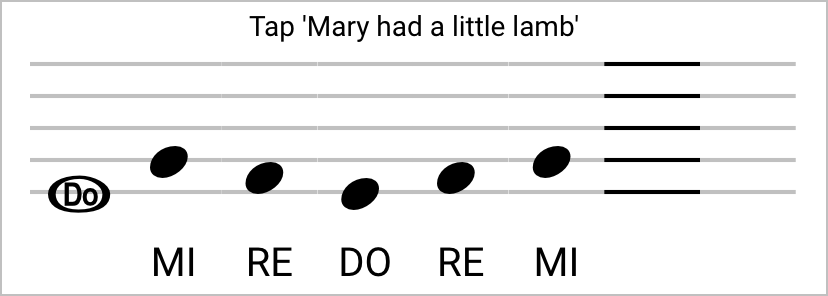
As an example of a non-vocal exercise, given that we’ve learned the first three syllables do, re, and mi, here the user is asked to tap out the notes of Mary had a little lamb:
Pitch Detection
Since the idea of having interactive vocal exercises was such an important aspect of Zarlino, one of the first areas I explored was the matter of real-time pitch detection. This was unfamiliar territory for me, and much of the theoretical reading I did involved mathematics that were a little bit beyond my ken. However, I found code samples for a couple of different algorithms that looked promising, so set about building a platform where I could adapt and test them for our own purposes.
I started out with a sample iOS application named AurioTouch from Apple’s developer website. This is basically a live oscilloscope viewer using the device’s microphone for input, but in addition to the basic waveform view, it also has single-spectrum and spectrogram views as well. So it was a great place to start in terms of opening and configuring audio streams, buffering the data, performing basic DSP and analysis, and visually graphing it. It was also a bit of an introduction to OpenGL/ES as I updated the code from using version 1.0 to 2.0 (though with Apple’s GLKit and built-in shaders; nothing fancy needed there).
The original demo code already included some spectral processing using a discrete Fourier transform (DFT) and related methods from Apple’s DSP library. So one potential method for detecting the singer’s pitch would be to simply pick the appropriate peak from the spectral data already being generated. However, I had a couple of concerns with this. First, I wasn’t clear about how accurate it could be: because the transform is split into equal-sized frequency bins, but pitch is based on a logarithmic scale, it means there’s effectively less resolution at the frequencies we are most interested in, which are towards the lower end of the range. (I looked briefly into more advanced transforms that address this in different ways, but didn’t understand enough to figure out how to implement them.)
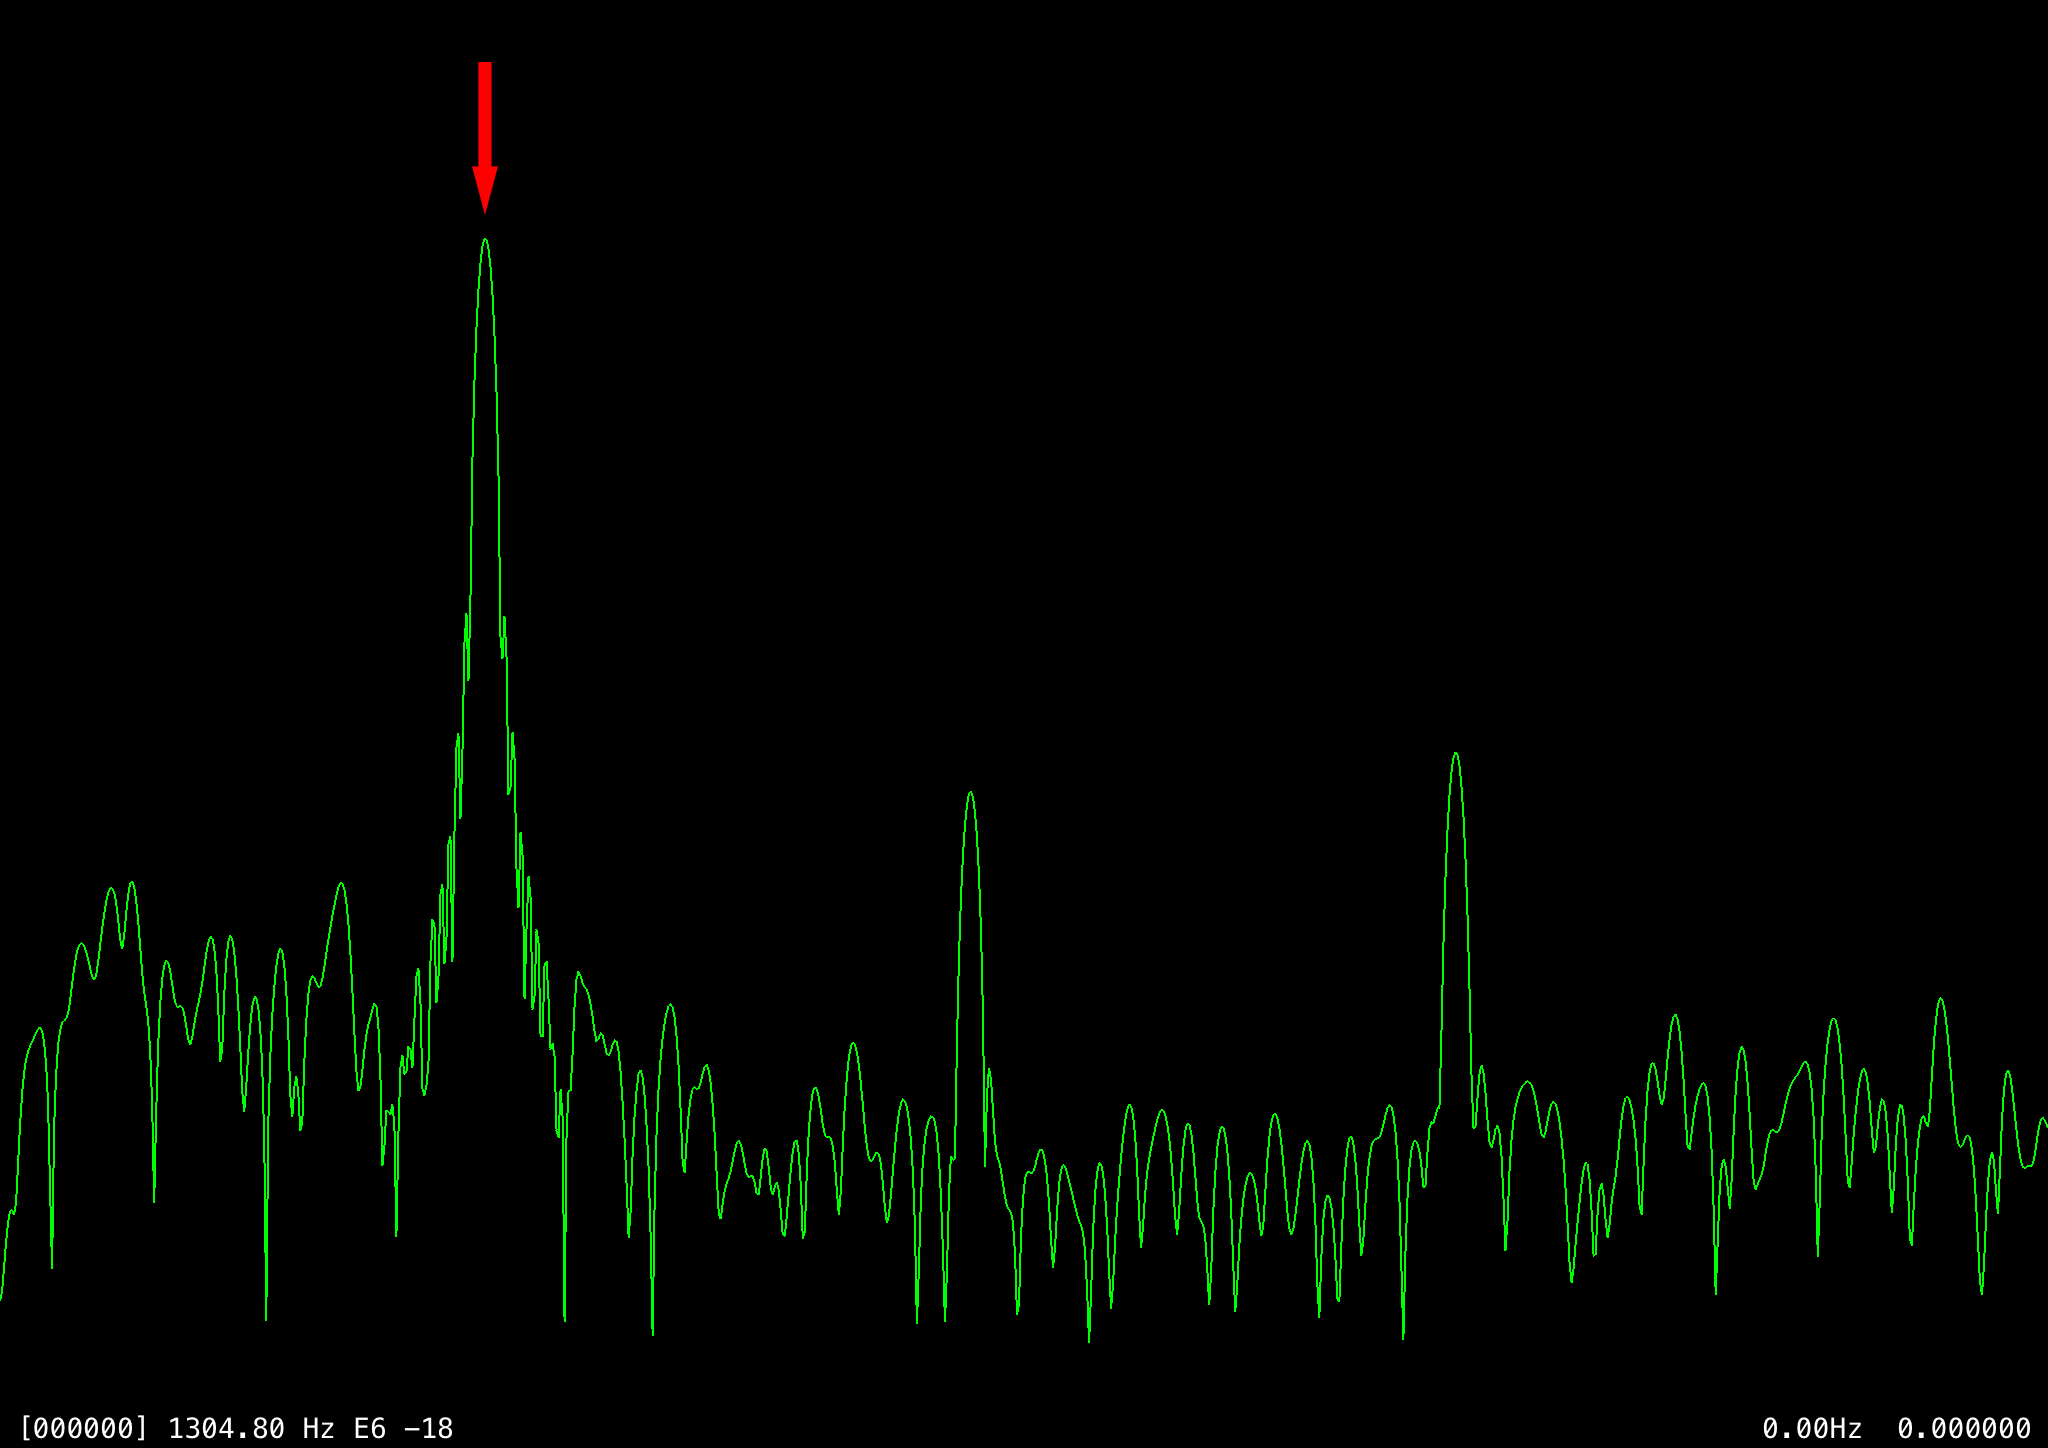
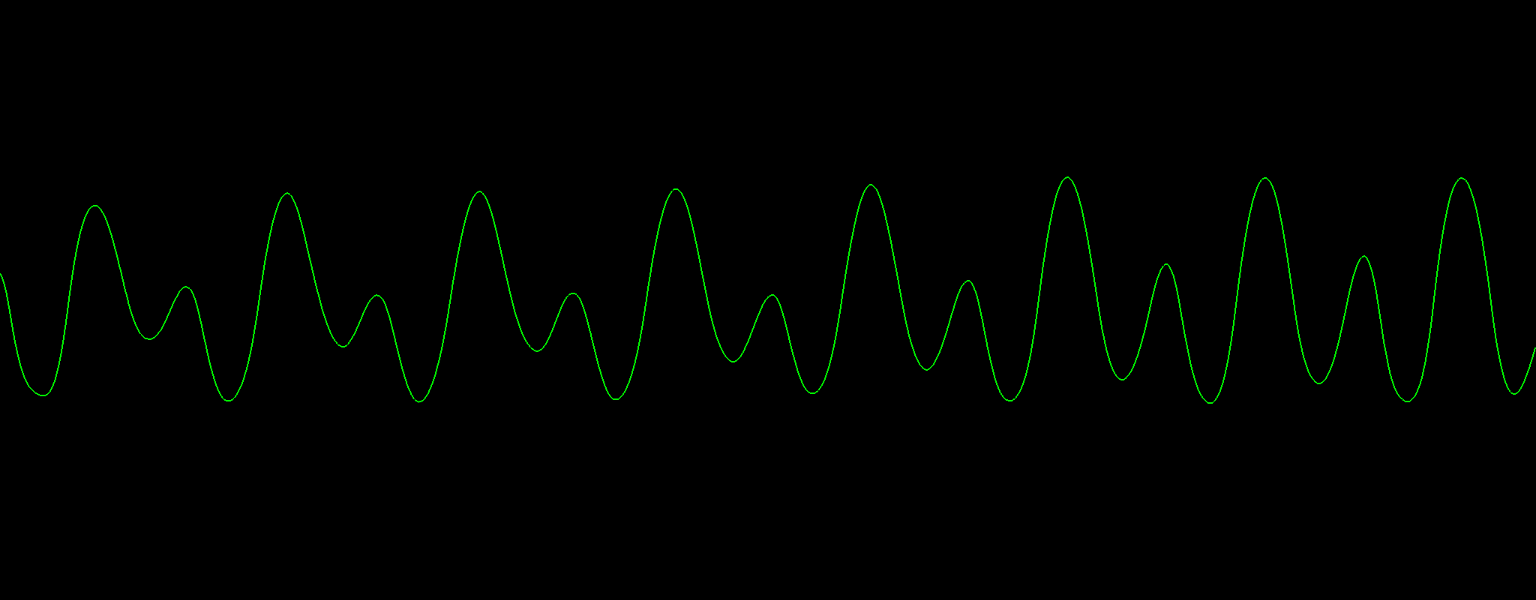
Another issue was that it’s not always clear which peak in the transform is the correct one. In the case of relatively pure sine waves, as in the following example, it’s fairly obvious that the fundamental frequency is represented by the strongest peak (the next two largest peaks are even harmonics):
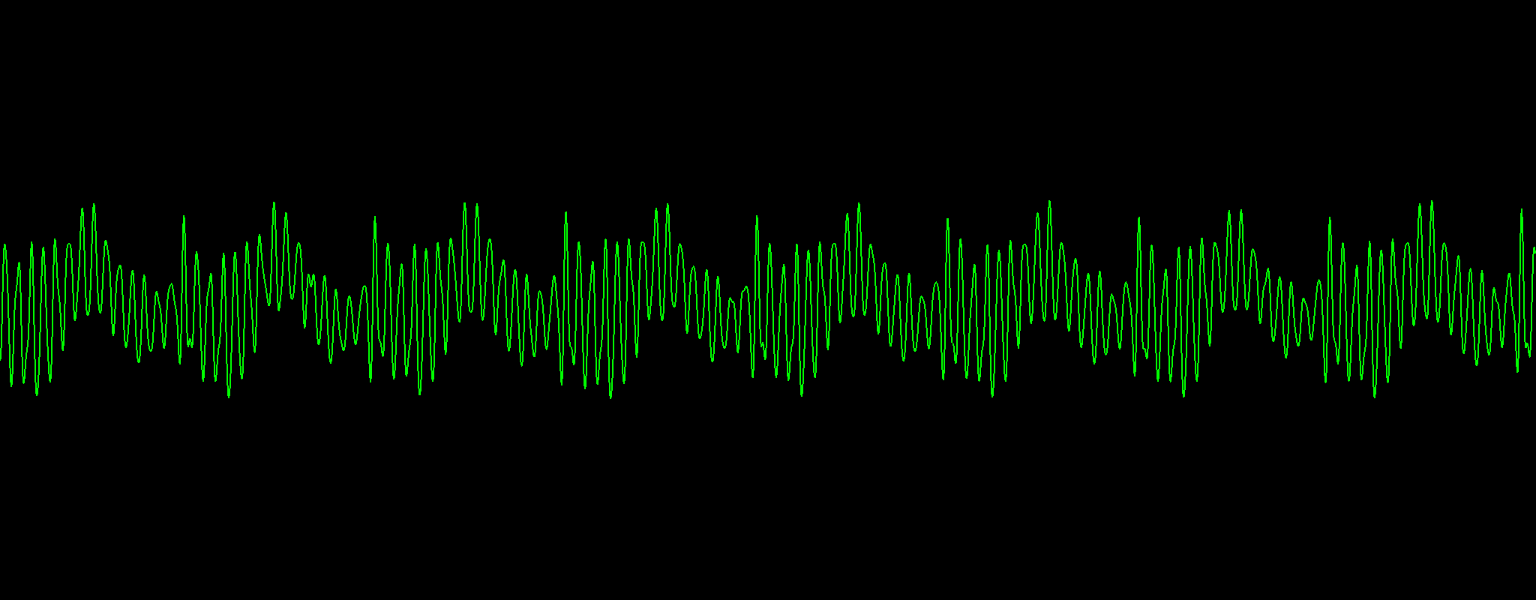
With human speech and singing, though, it’s not always so clear. Forward and open vowel sounds such as AH and OO are fairly clean, but with back tongue and nasal sounds such as EE and ER, a lot of additional resonant frequencies (called formants) are produced in the vocal tract, as shown in two contrasting waveform examples:
In cases like the latter sounds, it is quite common for higher-energy peaks in the DFT to represent those overtones rather than the fundamental frequency:
Two other main techniques that I investigated were autocorrelation and finding the peak-to-peak distance modes. The term autocorrelation covers a number of related techniques, but primarily I looked at the YIN algorithm. While this seemed to be reasonably accurate, I found it to be fairly expensive in terms of processing. The first step takes half of the sample window and “slides” it sample-by-sample across the other half of the window to find the offset that yields the smallest cumulative squared difference, which requires (n/2)2 subtractions and multiplications for each window. A second step, to normalise the results, needs an additional n additions, multiplications, and divisions.
The last method to mention here, finding the peak distance modes, was actually the first one I looked at in detail, and the one I eventually selected, at least for our prototype. A first pass through the entire window finds all of the peaks and troughs outside of a threshold value, and involves only subtraction/comparison operations. (This part of the method is like finding the zero-crossing rate, which is the most basic, but largely ineffective, approach.) Subsequent passes cross-match all of the peaks with each other, find the most common distances between them, and then average the results.
The original method that I borrowed potentially repeated the above steps a number of times, averaging and downsampling the window by half on each iteration, in an attempt to filter out noise and high-frequency components from the primary signal. This outer loop terminated as soon as two successive measurements yielded the same value, but in my experiments, I found relatively few frames where this extra processing yielded significant benefits. Instead, I focused on the peak cross-matching part, figuring the intensity of the samples in when matching them against each other, as well as a few other factors. In this sense, this method is a little like autocorrelation, but with a much smaller set of points.
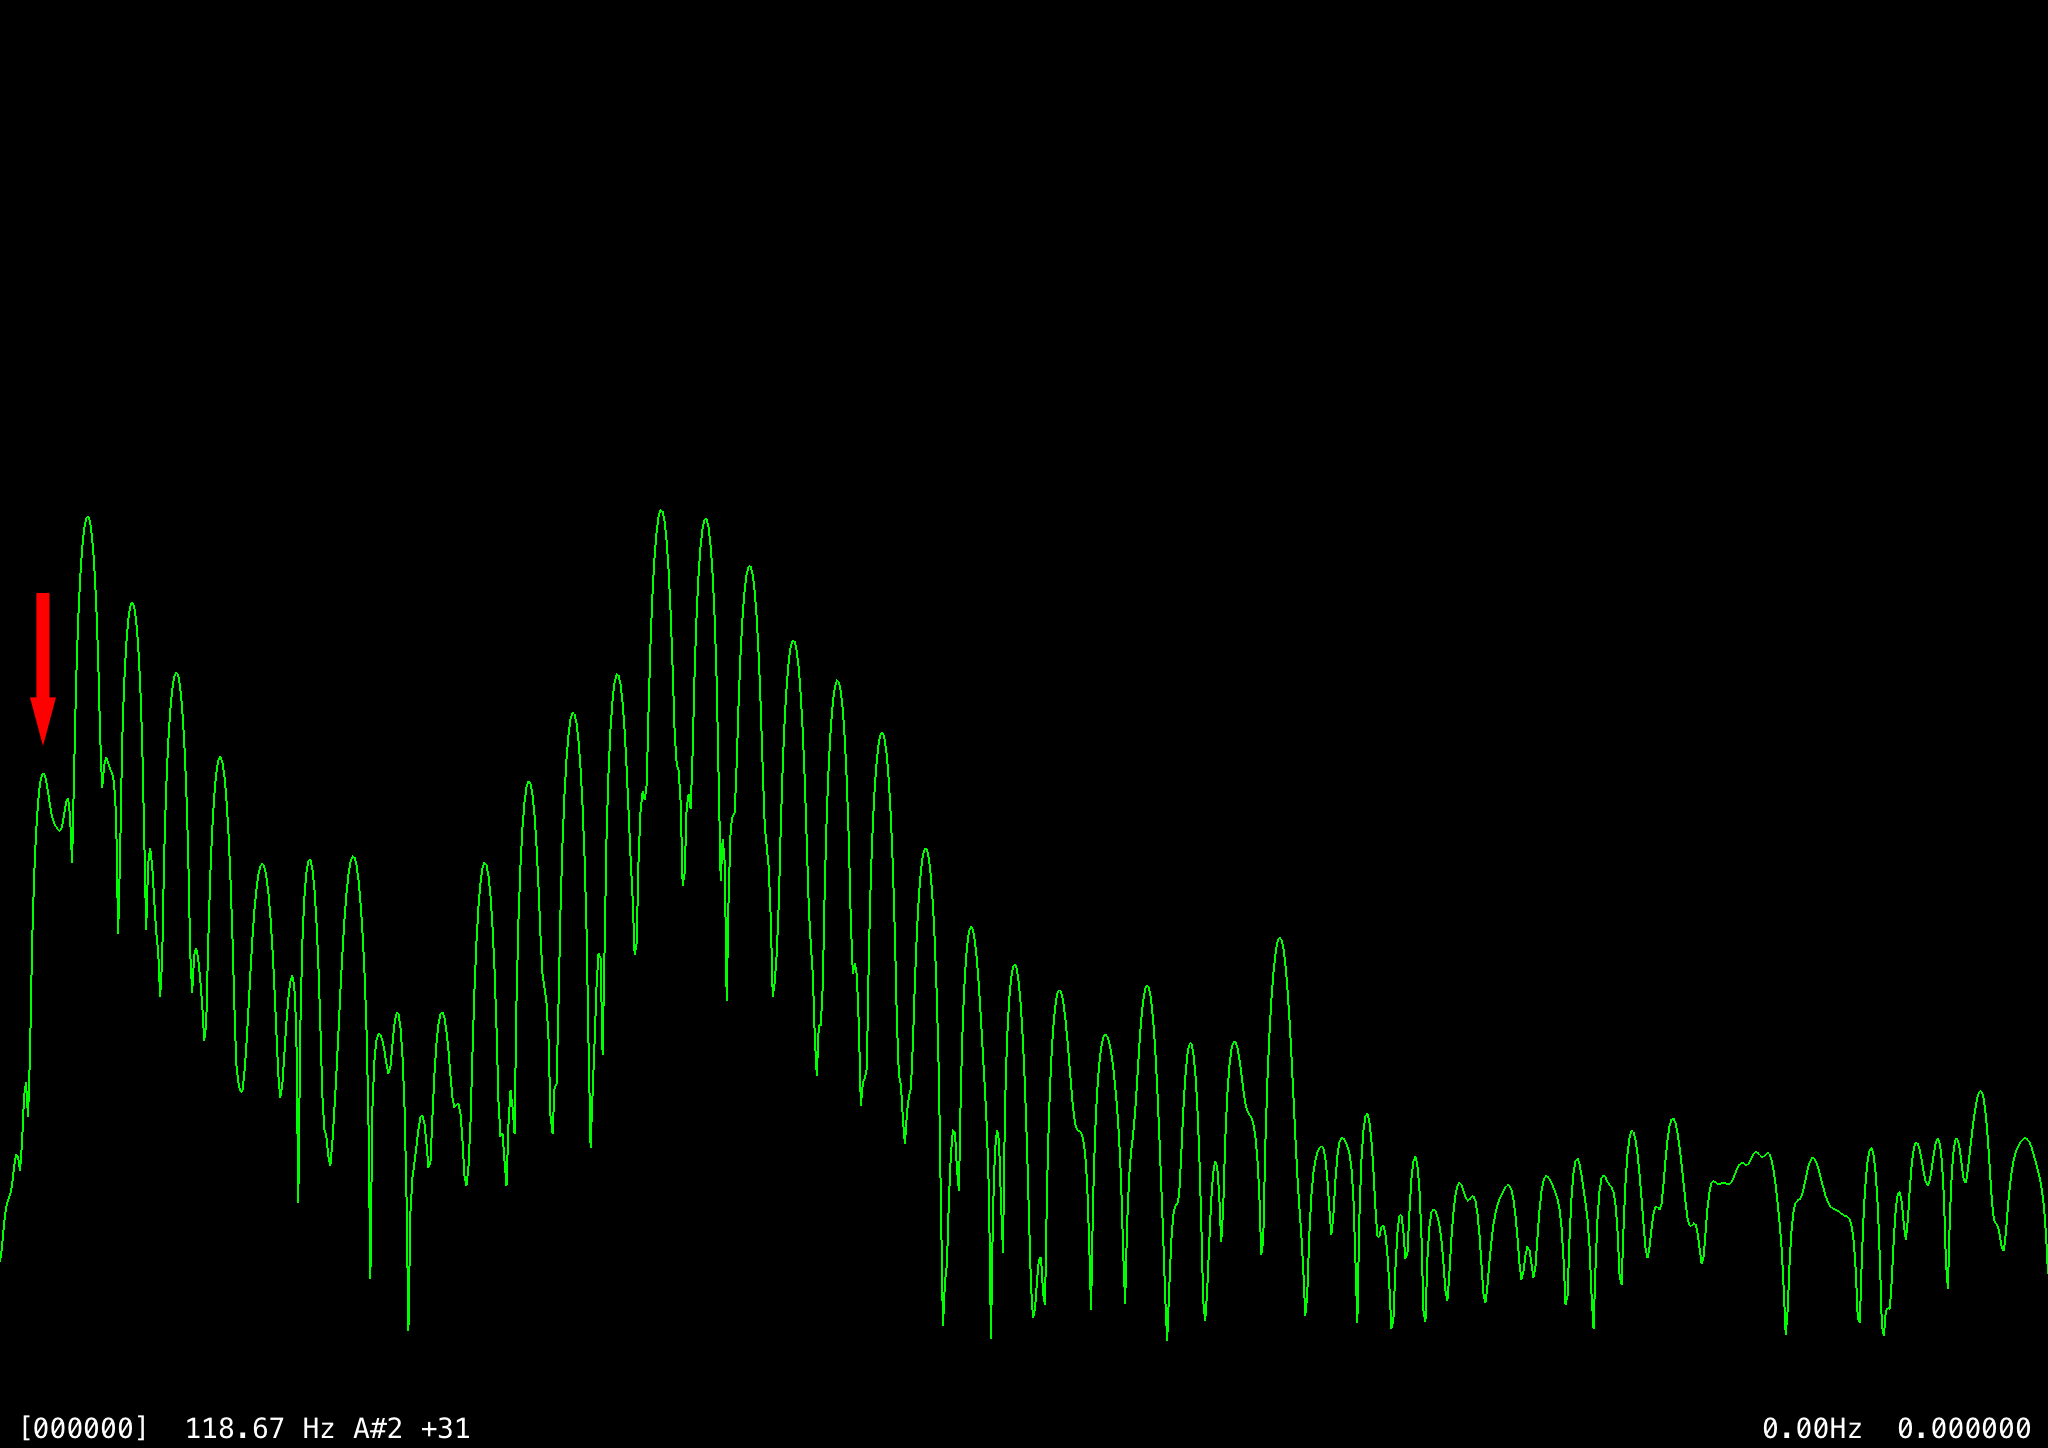
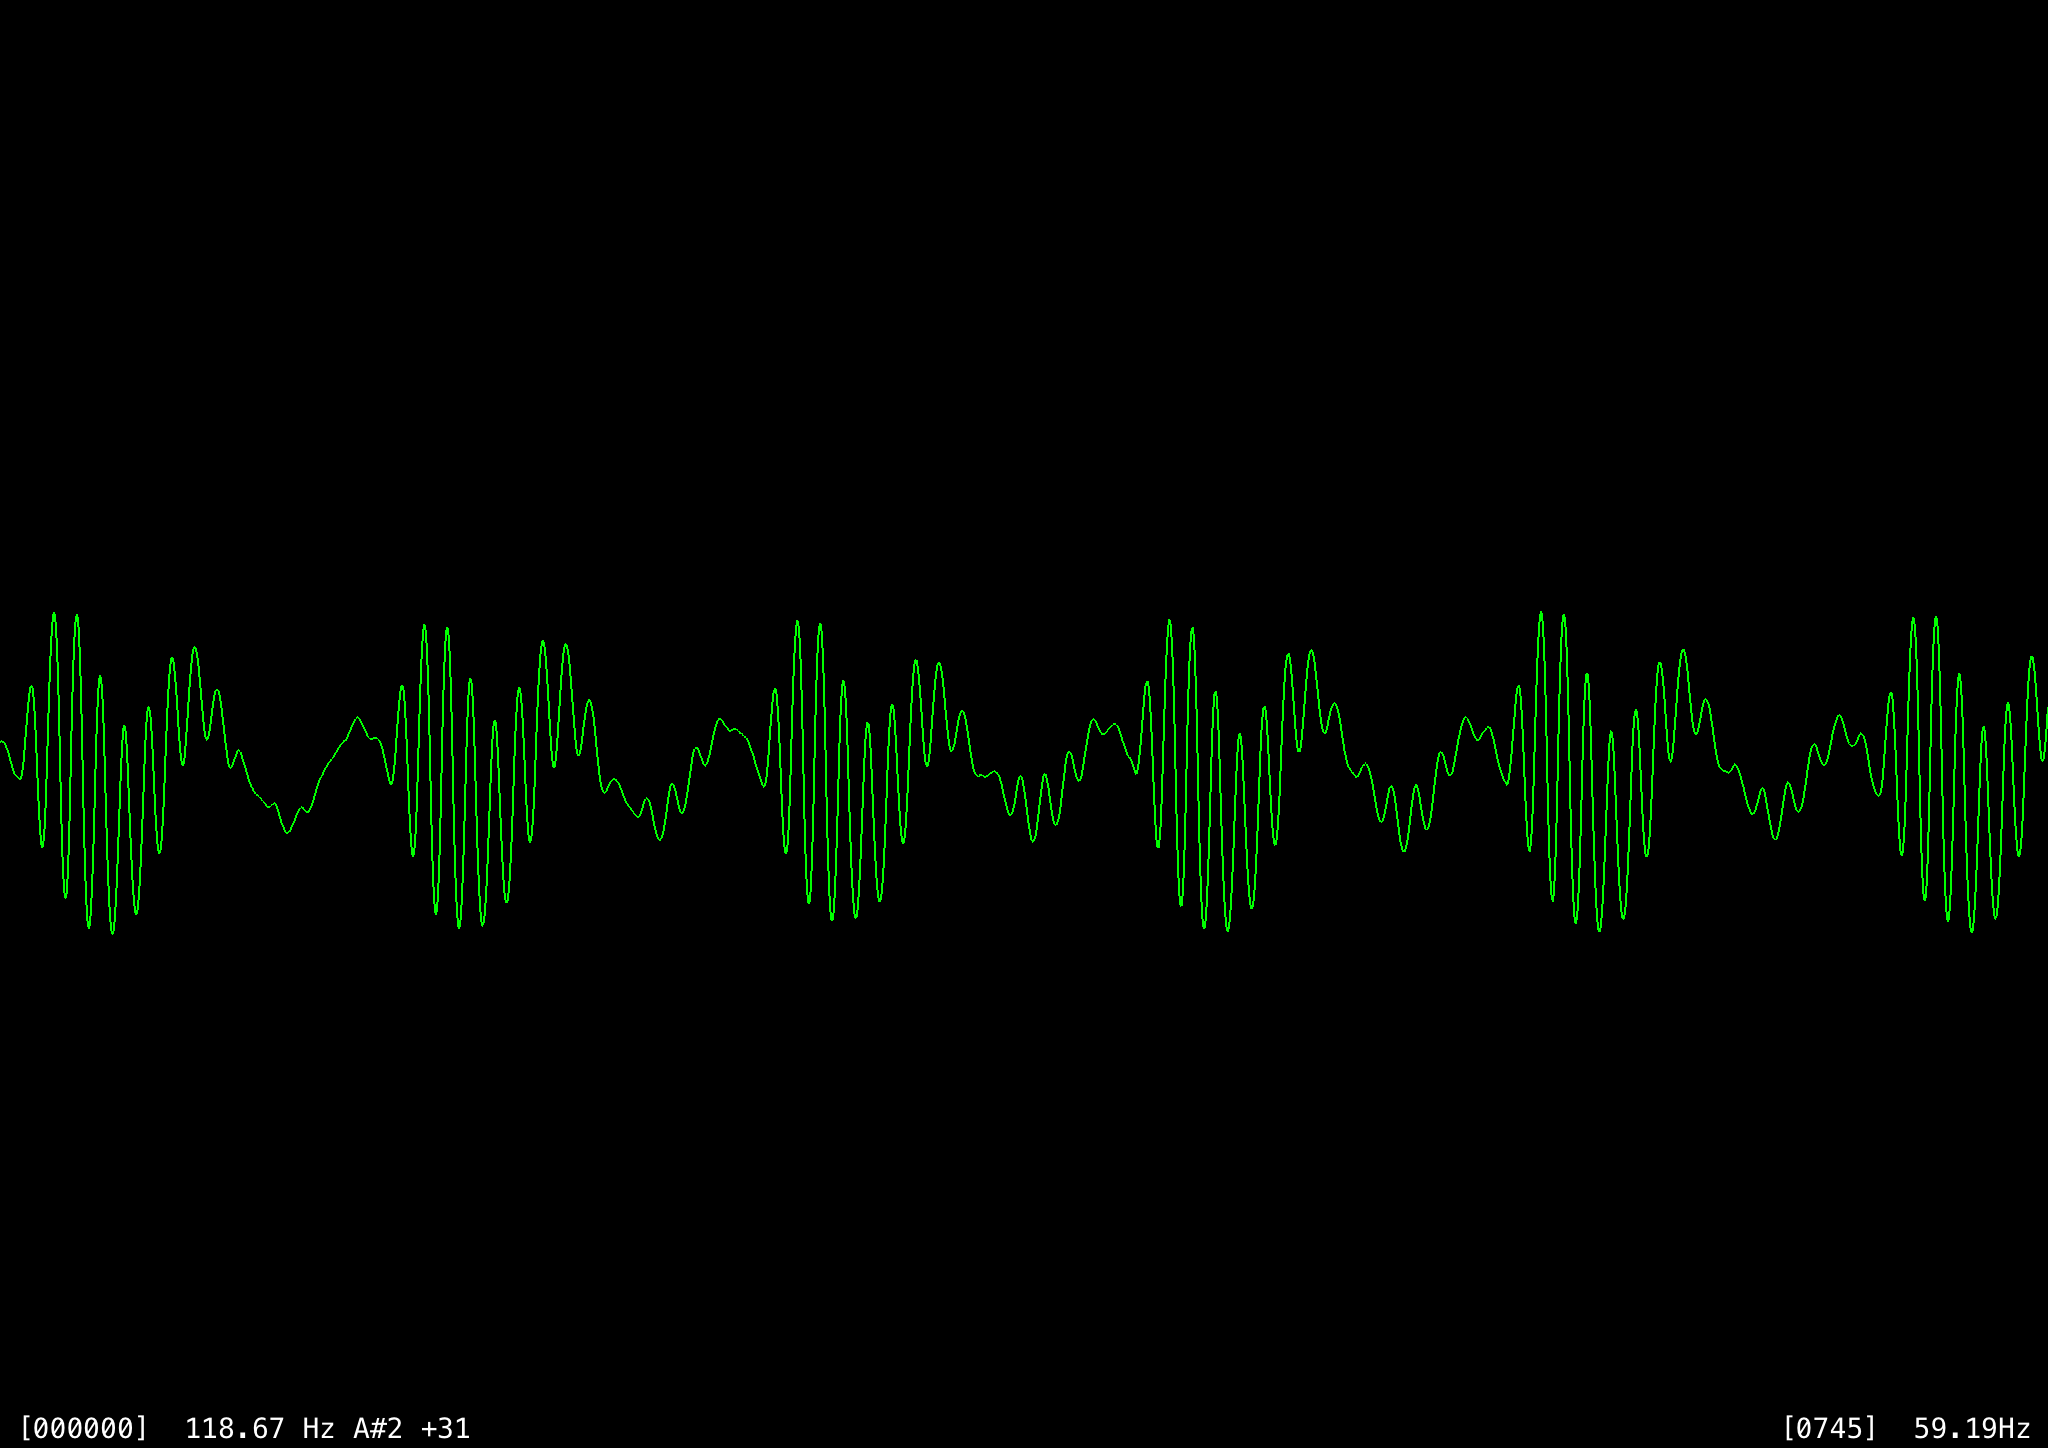
One problem with both this algorithm and autocorrelation is octave errors: the frequency is sometimes miscalculated as half of the actual value (or sometimes a third, quarter, or double), because samples that are two or three cycles apart wind up matching better. A sample frame of an ‘EE’ sound around 118 Hz shows the problem. The first image shows the raw waveform and the second the full autocorrelation, where values lower on the y-axis indicate stronger correlation.
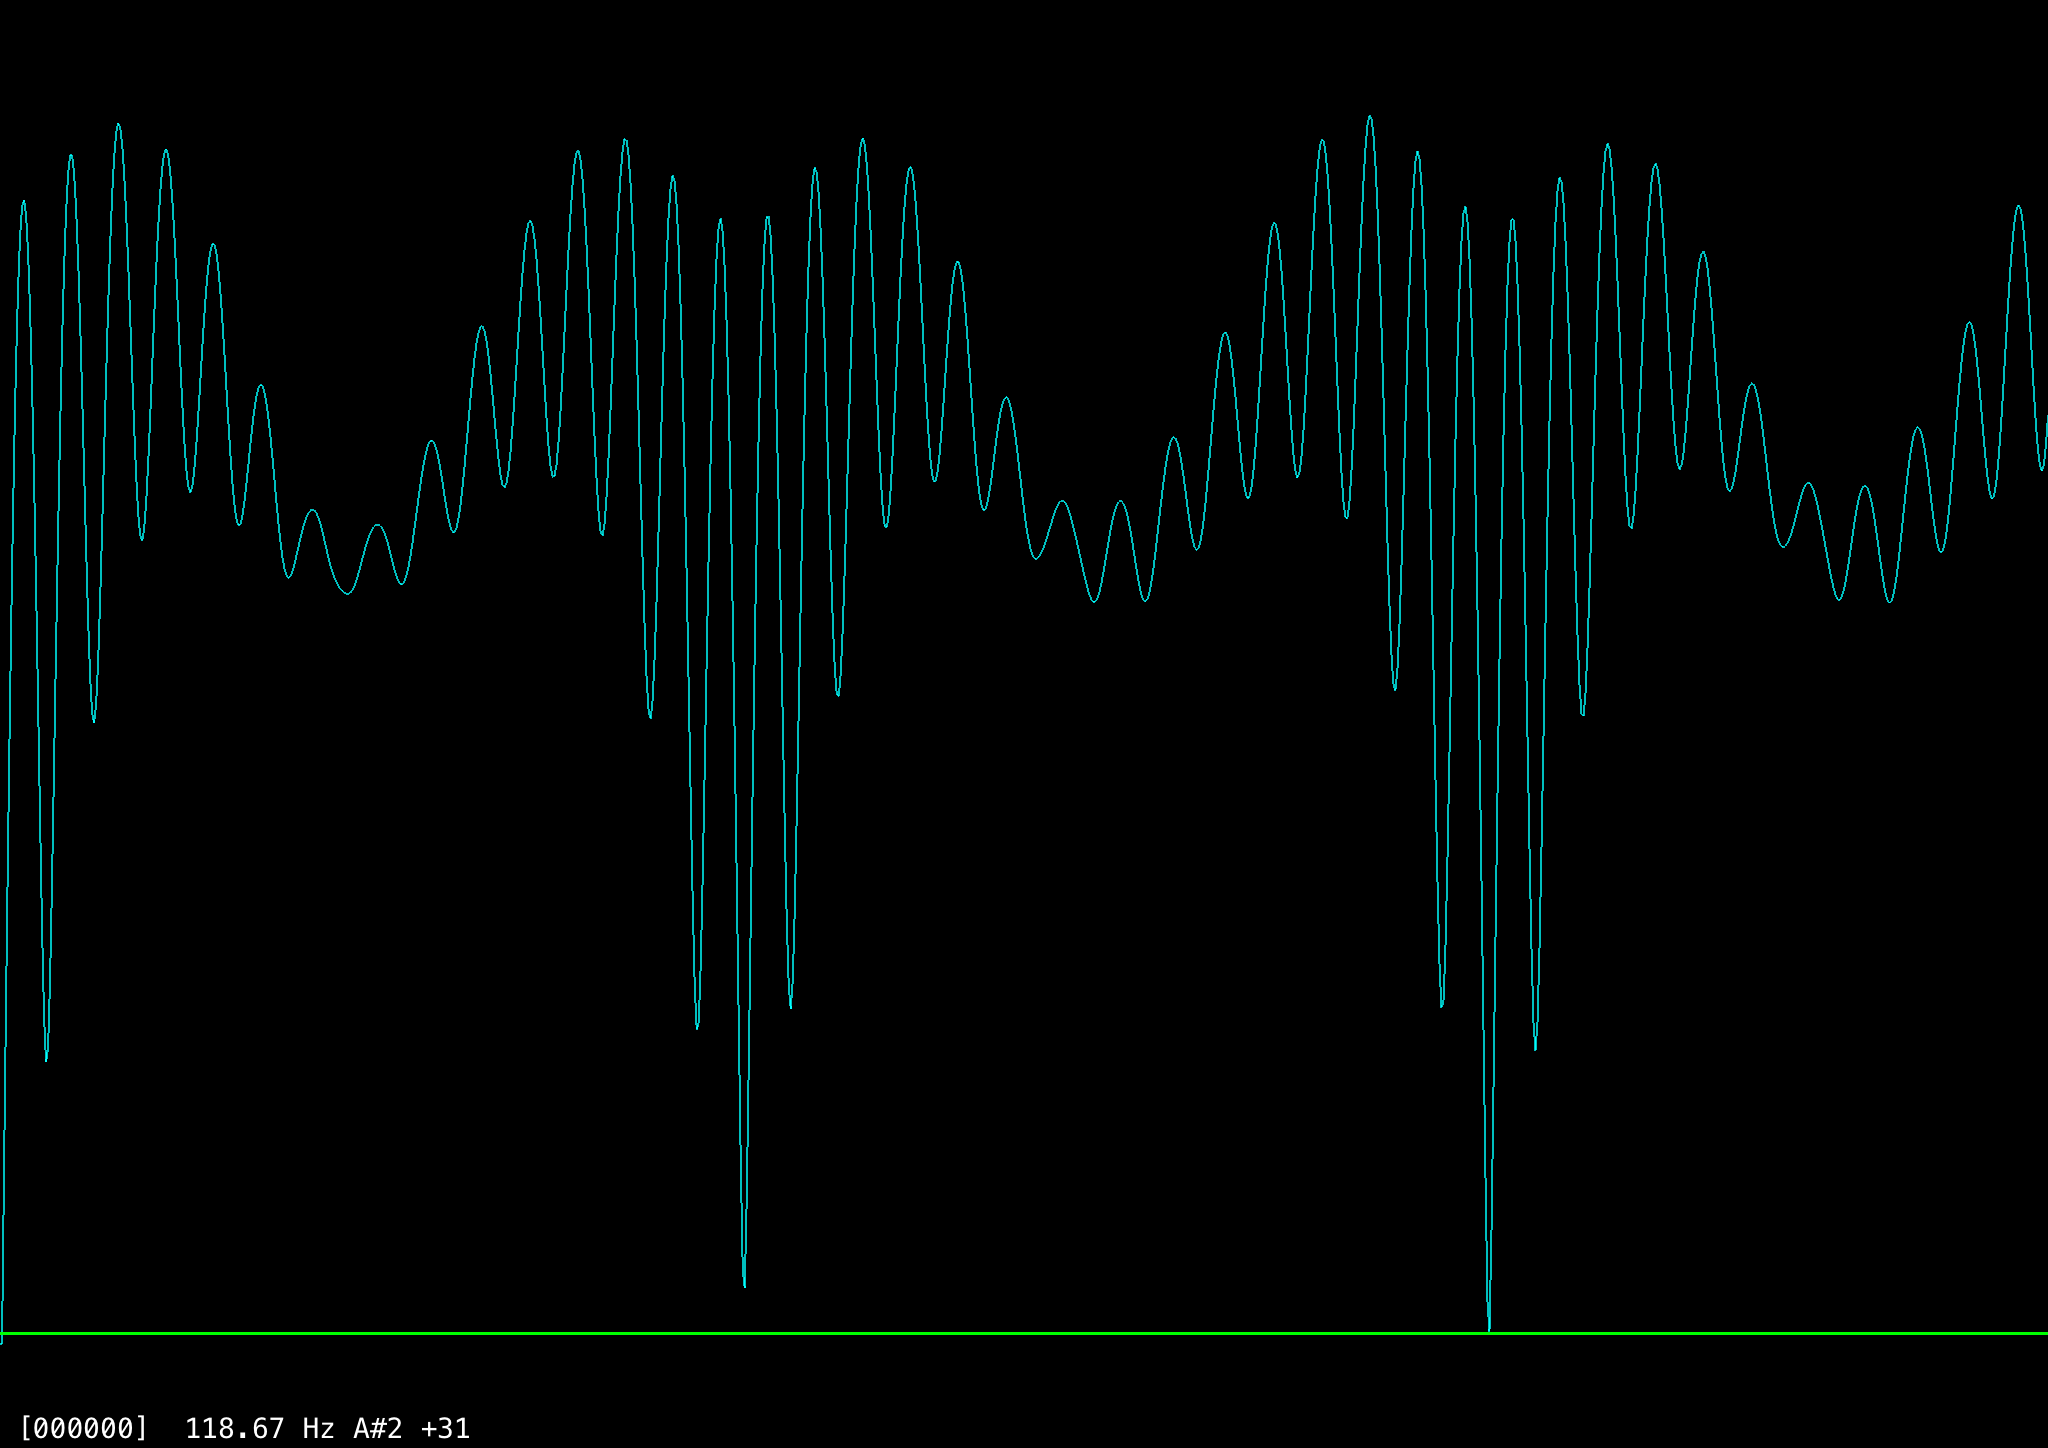
Ignoring the perfect correlation at index 0, there are two strong correlations at index 372 and 745 (~118 Hz and ~59 Hz respectively). The correlation at 745 is slightly stronger even though ~118 Hz is the correct pitch, most likely because of quantization errors. That is, suppose the distance between cycles in this frame were exactly 372.5 samples, then we’d get four high matches at a distance of 745, but perhaps three slightly lower matches at a distance of 372 and two at 373 (or vice versa). Averaging the near correlations together over a small window shows that five close matches are better than four exact matches.
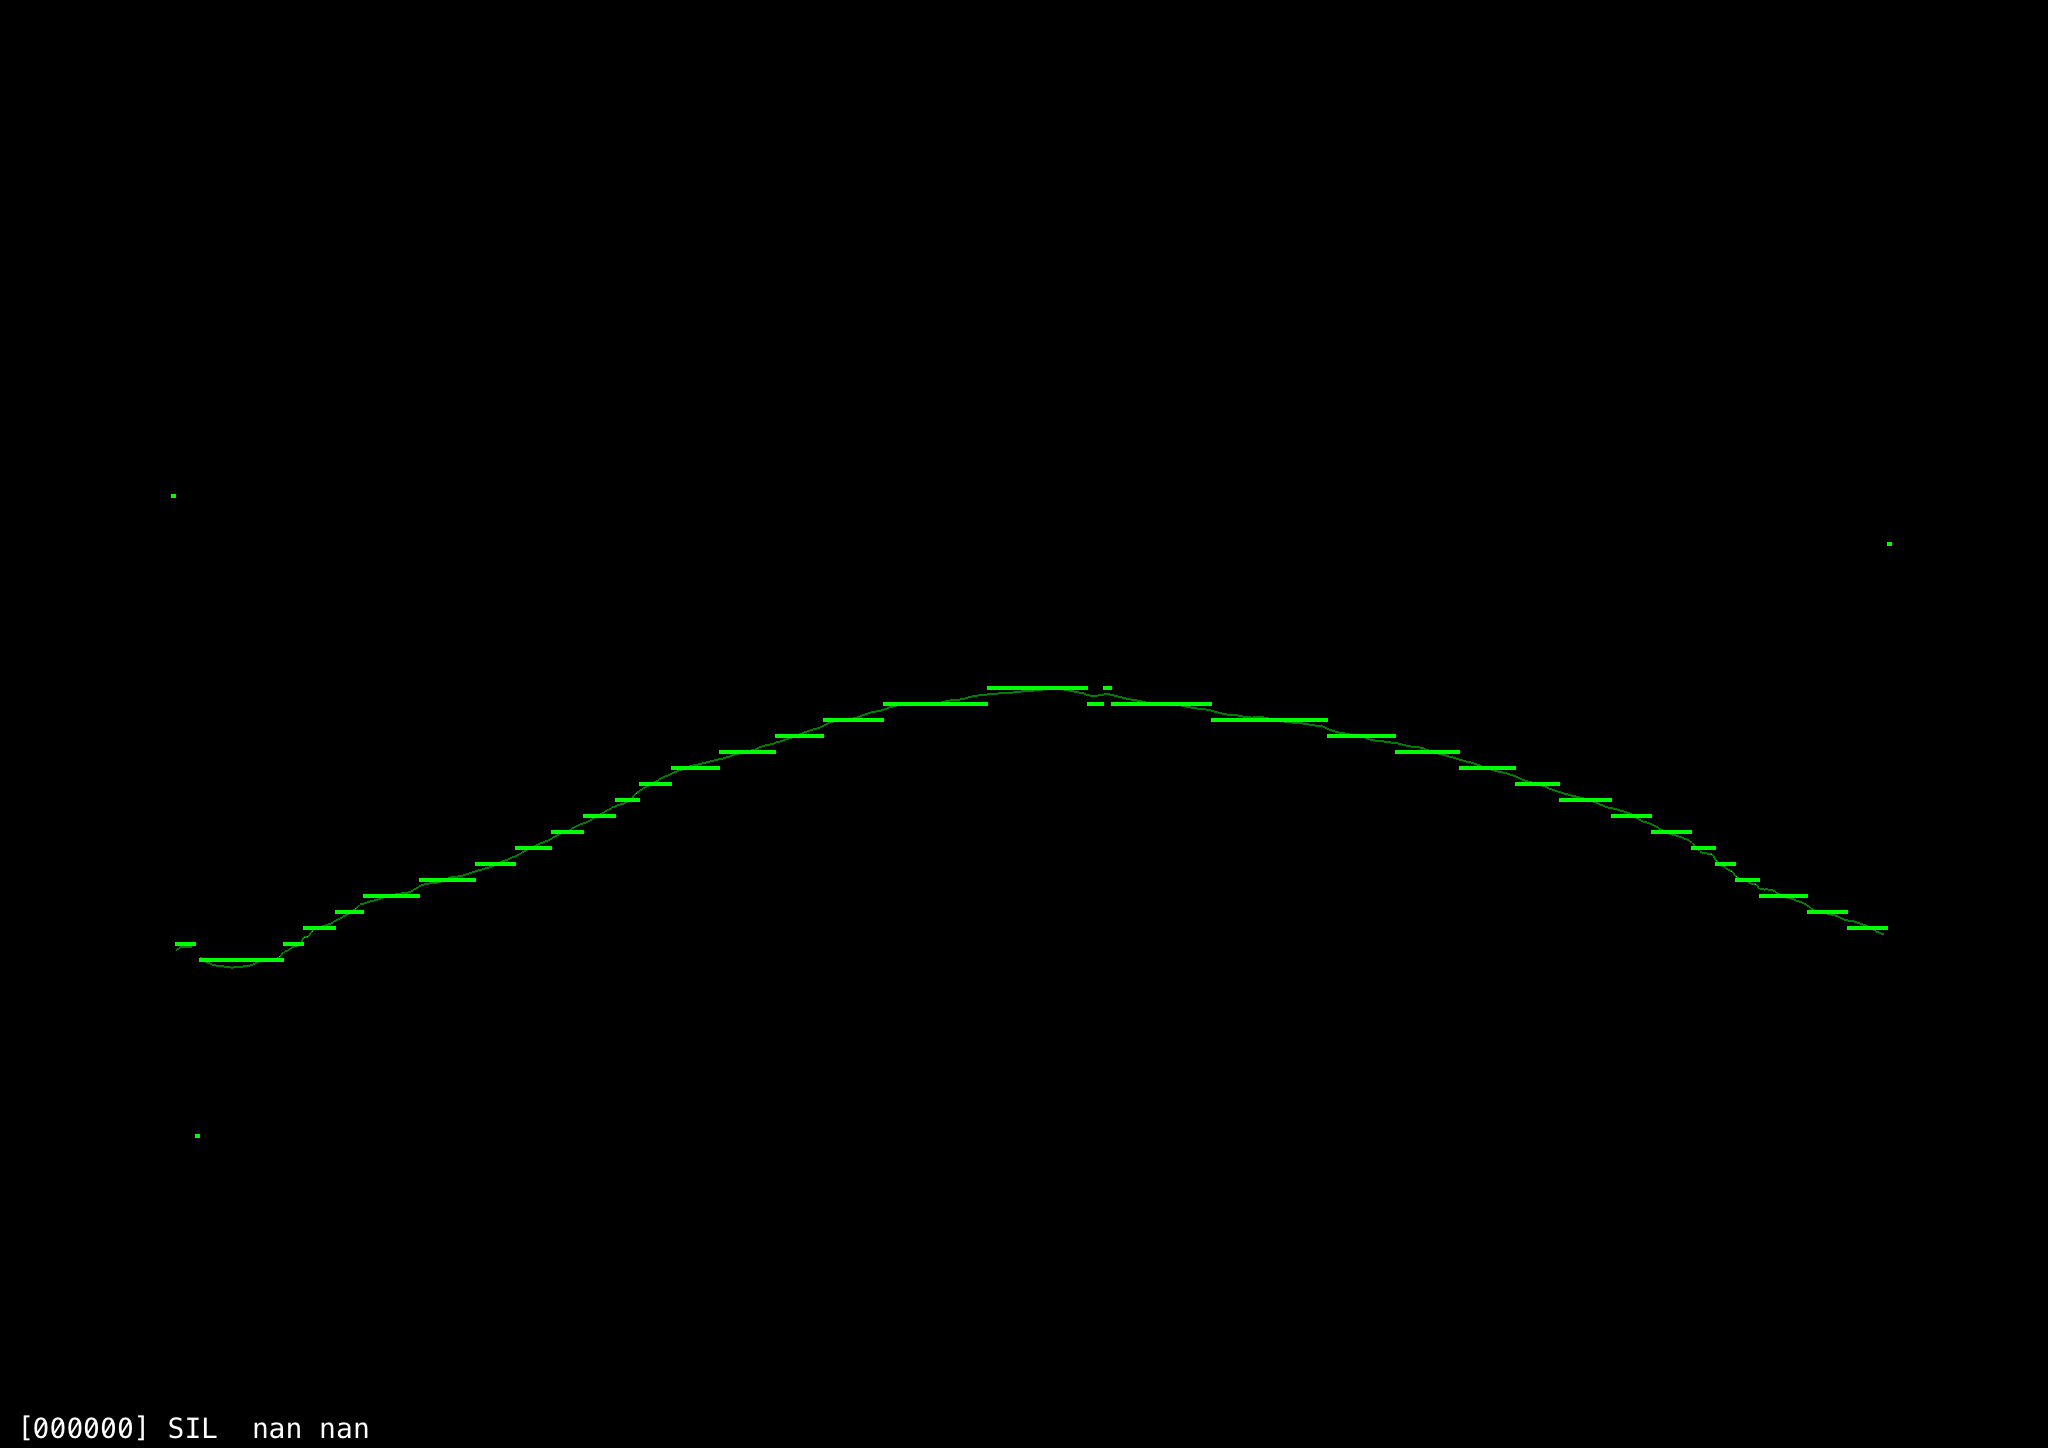
Overall this technique works well, but sometimes fails on particular frames. Using a longer analysis window of multiple frames and overlapping them over time helps filter these out. Individual octave errors are easily identified and corrected when compared against adjacent results. With open sounds like AH, the pitch analysis is nearly perfect, as this long sweep up and down in frequency shows. (The horizontal lines are distinct musical pitch values (semitones) since that is what we are primarily interested in for the application, whereas the thin, continuous line underneath is the measured frequency.)
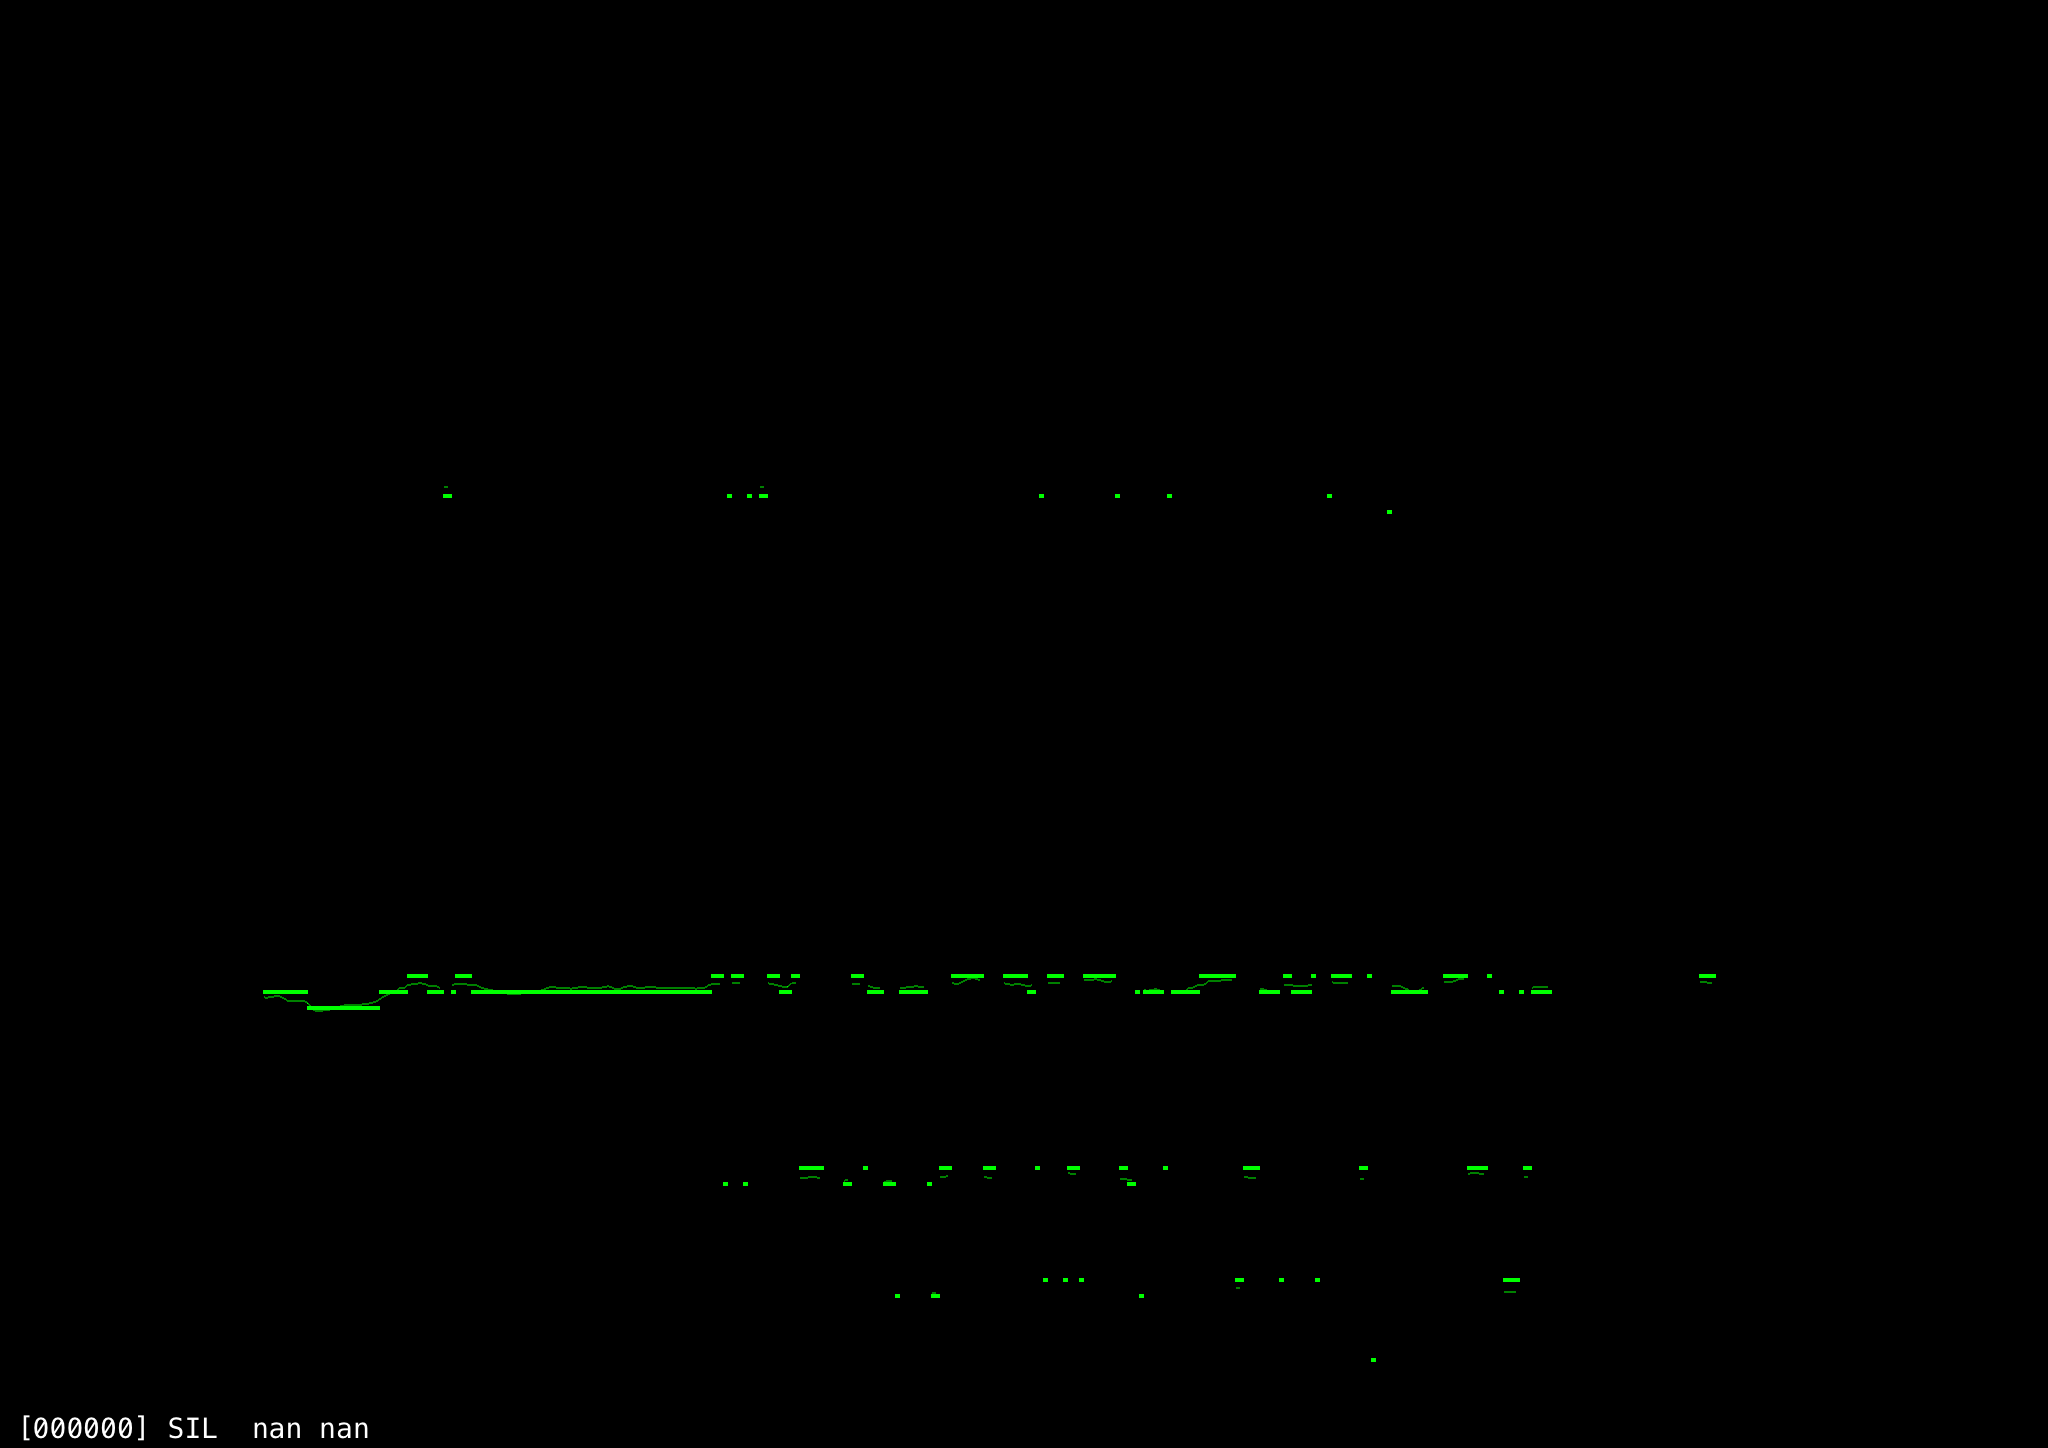
However, there are still cases where many frames in a row are miscalculated, as this EE sound sustained at a (somewhat) steady pitch shows. While most of the frames seem to have been accurately measured (especially at the beginning), there are also clear clusters of frames that were incorrectly measured to be one-half or one-third of the correct value (two or three cycles apart). There are also a few that were mistakenly identified as having a much higher frequency.
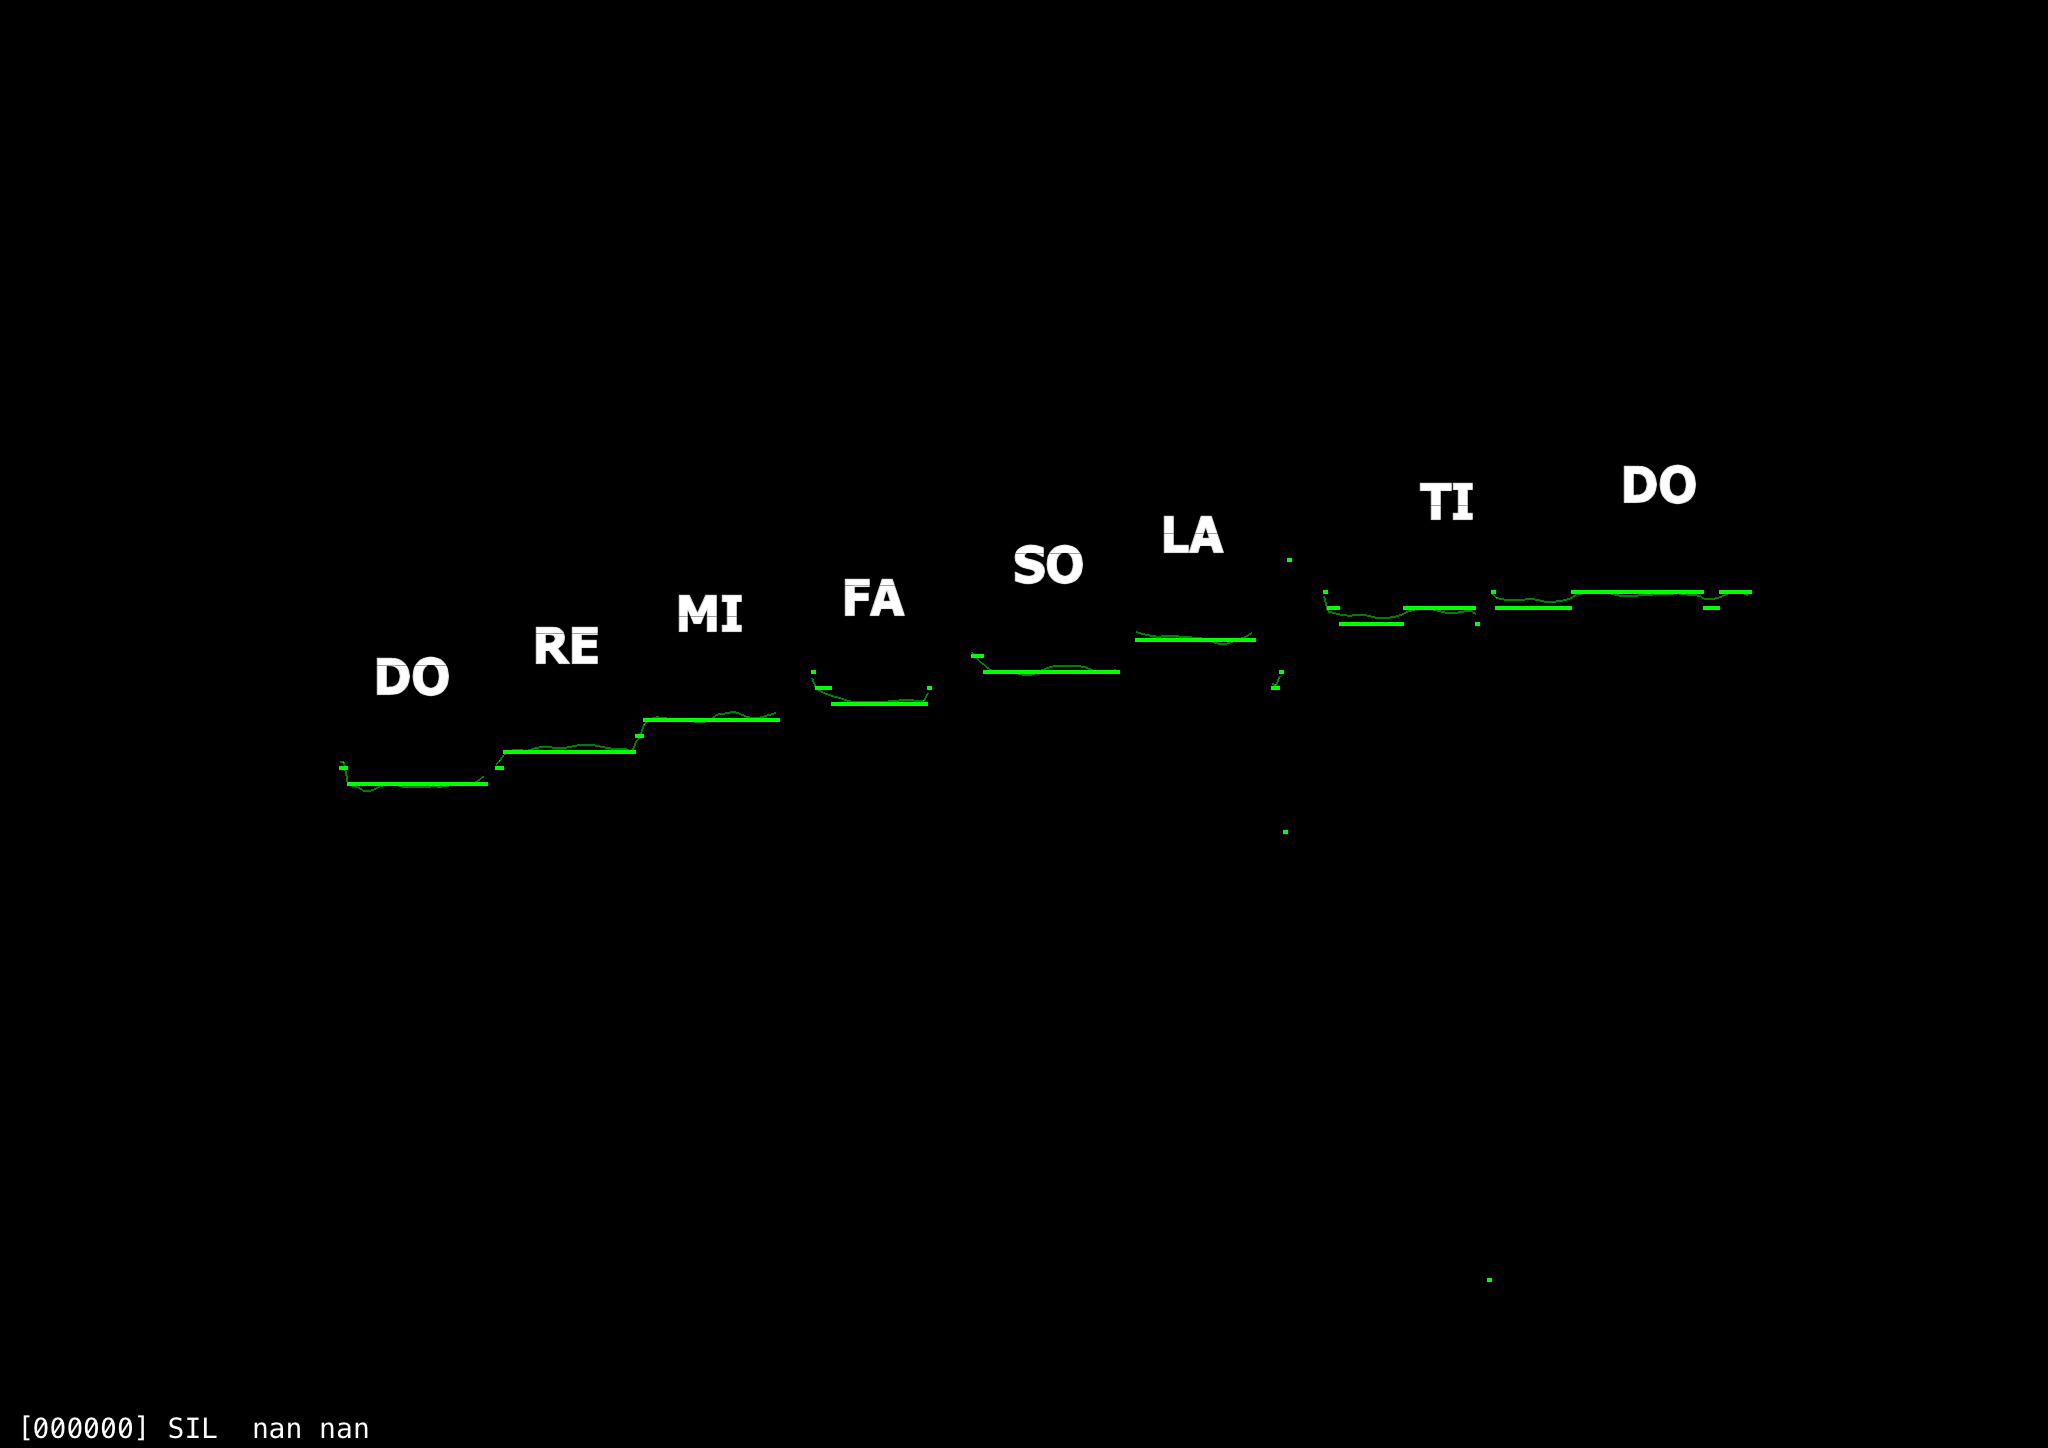
All in all, however, the algorithm is good enough for a demonstration exercise such as where the user might be expected to sing a major scale:
TODO: Continue to work on resolving pitch properly with back vowels. Ideally, find a way to reliably identify whether or not the user is singing the solfa names closely enough, using formant analysis.
Main Application
After getting the pitch detection part working reasonably well, I started to work on the main application. In the short term, we just wanted a working demo so that Michael could use it to start formulating the lesson contents. Ultimately, our goal was an installable universal application, and for a couple of reasons we wanted to try using a web-based platform. First, because more open-source and free web-based tools seemed to be available, which was important because we didn’t have any monetary investment. Second, whereas I’m more of a generalist, Michael’s experience is primarily in web development, and we wanted an environment we were both comfortable working in. We were already familiar with Cordova, the Ionic Framework and AngularJS, and a new version of Ionic based on Angular 2 had just been officially released a few months before, so I started the new project with that.
After getting a basic project set up, I ported the pitch algorithm to JavaScript (or really ES6) for use with the web application. I used a set of about 60 audio test files to ensure that it performed identically to the C++ implementation. Initially I was working only on Chrome and Android, but a few months later Apple released Safari 11, adding support for user audio streams, and with a few minor changes I got the app working there. iOS 11 should also likewise work, but permission to use the microphone is done through the application’s entitlements rather than a prompt in the browser, so I haven’t yet tried that. Windows 10+ with Edge also reportedly works, but I haven’t yet tested that platform.
Music Rendering
Aside from the pitch detection question, the next major trick to solve was the matter of rendering musical notation. I explored a couple of different packages, but one that looked especially promising was VexFlow, certainly in terms of its musical “knowledge” and also because it could use either a canvas- or SVG-based rendering engine.
After getting a quick prototype running with VexFlow and experimenting with it for a few days, however, I ran into some tough problems having to do with animations and interactivity. While I was using the SVG engine and could get access to the generated elements (such as individual noteheads), I found that they were grouped in ways that were awkward for me to use, especially for animations that involved scaling and rotation.
Another thing that made me uncomfortable using VexFlow and directly accessing the generated SVG elements is that it really went against the philosophy of Angular, which ideally hopes to separate the application completely from the HTML document object model (DOM).
After a bit of debating with myself (and some with Michael), I decided to put the VexFlow implementation aside and explore other options. This was a tough argument to make, because on the surface level — literally the matter of presentation — VexFlow solved a huge number of problems and surely would be able to handle anything Michael could think of throwing at it for a good many years. Replicating all that musical engraving knowledge would not be a trivial task.
On the other hand, since Zarlino was still only in its earliest conceptual phase and we had only a few simple lessons designed, much of those musical capabilities would not be needed for some time. It would be more helpful at this stage to have full control over a limited set of musical elements, than it would be to have limited control over a large set of elements, so that we could more easily explore the broad experience.
I found a great open-source typeface designed specifically for musical engraving named Bravura, and with a lot of experimentation with Chrome’s developer tools, found that I could do a fair number of basic tricks using it within absolutely positioned HTML elements. I figured I could use Angular components for the major music notation elements. For example, a single musical staff is represented by ZarStaffComponent, for which part of the template appears below. It shows that the staff has a collection of segments, which are themselves components (for example, ZarStaffNotesSegmentComponent or ZarStaffClefSegmentComponent).
<div class='staff-scroller'
    [style.fontSize.px]='fontSize'
    [style.height.em]='height'
    [style.width.em]='width'
    [style.marginTop.em]='marginTop'>
  <ng-container *ngFor="let factory of childFactories;let i = index;">
    <ng-container [ngSwitch]='factory.types.component'>
      <zar-staff-clef  #segspan #segclef
                       *ngSwitchCase  = 'ZarStaffClefSegmentComponent'
                        class         = 'staff-segment'
                       [index]        = 'i'
                       [staff]        = 'factory.data.staff'
                       [params]       = 'factory.data'></zar-staff-clef>

      <zar-staff-notes #segspan #segnote
                       *ngSwitchCase  = 'ZarStaffNotesSegmentComponent'
                        class         = 'staff-segment'
                       [index]        = 'i'
                       [staff]        = 'factory.data.staff'
                       [params]       = 'factory.data'></zar-staff-notes>

    </ng-container>
  </ng-container>
</div>
Each segment is self-contained and includes all of the elements needed to render it, including the background staff lines, ledger lines, notes (or clef), and caption (or lyrics). However, at this stage, each of these can be represented by simple text strings within HTML span elements, so we do not need Angular components below this level. For example, an extract from ZarStaffNotesSegmentComponent:
<span *ngIf='lines'
      class="staff-lines"
      [ngClass]="lines.classes"
      [attr.data-fragid]="lines.fragid">{{lines.text}}</span>
<span>
  <span *ngFor='let ledger of ledgers;'
        class='staff-ledger'
        [ngClass]="lines.classes"
        [style.left.em]="ledger.left"
        [style.top.em]="ledger.top">{{ledger.text}}</span>
  <span *ngFor="let note of notes;"
        class="staff-notes"
        [ngClass]="note.classes"
        [style.left.em]="note.left"
        [style.top.em]="note.top"
        [attr.data-fragid]="note.fragid">{{note.text}}</span>
</span>
<span *ngIf='caption.text'
      class="staff-text"
      [ngClass]="caption.classes"
      [style.top.em]="staff.textTop">{{caption.text}}</span>
TODO: Currently only these two types of segments are supported (notes and clefs), but this model is easily extended for time signatures, key signatures, and other notational elements. In the longer term, with more complicated exercises, I expect that using individual HTML elements and Angular bindings will become too “heavy” and we would want to switch over to using canvas-based drawing.
More information about Zarlino and the demonstration app can be found at https://cantusfirmus-zarlino-demo.firebaseapp.com/.